Friday, July 26, 2013

การ Setup Alarm Torque


Torque

การ Setup Alarm 

ประโยชน์ของการเปิด Alarm นั้นเพื่อเป็นการตั้งเตือนเราเมื่อเกิดเหตุการณ์ต่างๆ เช่น ความร้อนสูง

วิธีการ

ที่หน้าแรกของ Torque นั้นให้เรากด Menu ของ Android
จะปรากฏ Menu ดังรูปด้านข้าง ให้เลือกไปที่ Settings
เลือกไปที่ Manage Alarms ดังรูปด้านข้าง
ให้กดที่ Menu ของ Android จะปรากฏ Menu ขึ้นมาดังรูปด้านข้าง เลือกที่ Add Alarm
เมื่อปรากฏหน้า Alram Editor ให้เราใส่ข้อมูลต่างๆ โดยมีรายละเอียดดังนี้

Alarm name ชื่อของข้อมูลที่จะตั้งให้มันเตือน ใส่ได้ตามใจชอบ 
Sensor to mornitor ข้อมูลที่จะตั้งเตือน ให้เลือกตาม list ที่ปรากฏเลยครับผม  อยากได้แบบไหนเลือกตามสบายครับ

Alarm type รูปแบบการเตือน ตั้งให้เตือนตอนค่าสูงเกิน เลือก maximum เตือนเมื่อค่าต่ำกว่ากำหนดเลือก minimum

Alarm trigger value ค่าที่จะกำหนดให้มีการ Alarm เกิดขึ้น ชื่อในส่วยนี้จะเปลี่ยนไปตาม Sensor to mornitor นะครับผม
ในตัวอย่างนี้  ผมตั้งชื่อ Alarm เป็น ECT110 ใช้ตรวจเช็คความร้อนหม้อน้ำไม่ให้เกิน 110 องศาเซลเซียล
หลังจากที่กลับมาที่หน้า Torque Settings ให้เลือก Speech/Alarm Settings  และให้เลือกที่ Enable Speech
ให้เลือกที่ Auto clear alarms เพื่อให้ปิด Alarm อัตโนมัติ

Wednesday, July 10, 2013

การติดตั้งและ setup Torque


Torque

หลังจากที่เราได้นำเอา ELM327 OBD2 ติดตั้งเข้าไปที่ port OBD2 ในรถแล้ว

ให้ทำการ pair bluetooth ELM327 กับ Android Device ก่อน โดยปกติแล้ว Password ที่ใช้ในการ pair จะเป็น 1234

วิธีการ pair bluetooth

1.เปิด Setting ดังภาพด้านข้าง
2.เลือกที่ Bluetooth

3.ค้นหา Device ในที่นี้จะชื่อ OBDII (อาจมีชื่อเรียกอย่างอื่นอีก เช่น Vgate หรือ ELM เป็นต้น) ให้กด Pair device โดยปกติ password ในการ pair device จะเป็น 1234

ขั้นตอนการติดตั้งและตั้งค่า Torque

ให้ Download file APK ที่ใช้ติดตั้งของ Torque ที่แนบอยู่ใน email มาติดตั้งใน Android device

หลังจากติดตั้งเสร็จจะปรากฏ icon Torque ดังรูป
เมื่อเปิด Program ขึ้นมา จะปรากฏดังรูปด้านข้าง
จะมีการสอบถามว่าจะทำการเปิด GPS หรือไม่

ในส่วนนี้ขึ้นอยู่กับผู้ใช้งานว่าต้องการเปิดหรือไม่

(หากไม่เปิดใช้งานจะทำให้ Torque ในส่วนที่ต้องการ GPS ไม่สามารถใช้งานได้ เช่น การวัดความเร็วจาก GPS เมื่อเทียบกับที่ ECU ส่งมาว่าแตกต่างกันหรือไม่)
ให้สังเกตที่มุมบนด้านซ้ายจะมี icon เล็กๆปรากฏอยู่
หาก icon นั้นกระพริบอยู่แสดงว่ากำลังทำการเชื่อมต่อส่วนนั้นอยู่ และถ้าเชื่อมต่อเสร็จแล้ว icon จะติดค้างและไม่กระพริบอีกนั้นหมายถึงอุปกรณ์ในส่วนนั้นเชื่อมต่อและพร้อมใช้งานแล้ว

โดย icon แต่ละตัวมีความหมายดังนี้
1.รูปดาวเทียม หมายถึง GPS
2.รูปโทรศัพท์ หมายถึง Android Device ที่กำลังใช้งานอยู่
3.รูปสีเหลี่ยมคล้ายถ่านไฟฉาย หมายถึง ELM327
4.รูปรถยนต์ หมายถึง ECU

ในบริเวณมุมบนด้านขวาจะปรากฏ Profile หมายถึง Profile ของรถที่เราทำการเชื่อมต่ออยู่ จะกล่าวถึงต่อไปอีกครั้ง
ในการใช้งานครั้งแรกนั้น เราจำเป็นต้องปรับตั้งค่าใน Program Torque และ Profile ของรถให้เรียบร้อยเสียก่อน โดยมีวิธีดังนี้

1.กดไปที่ Android menu (จะมีลักษณะสัญลักษณ์เป็นรูปขีดตามแนวขวาง 3 ขีด อยู่ใกล้กับปุ่ม Back และ Home)

2.จะปรากฏ Menu ขึ้นมาดังรูปด้านข้าง ให้ทำการเลือก Vehicle Profile เพื่อตั้งค่าต่างๆของรถท่านเสียก่อน โดยค่าที่จำเป็นก็จะมีดังนี้
 - ความจุของกระบอกสูบ
 - น้ำหนักรถโดยรวม
 - ชนิดของเชื้อเพลิงที่ใช้งาน
 - ความจุถังเชื้อเพลิง
 - ปริมาณเชื้อเพลิงที่เหลืออยู่ในปัจจุบัน
 - ความเร็วรอบสูงสุด
 - ราคาเชื้อเพลิง
เป็นต้น
หลังจากตั้งค่า Profile รถเสร็จแล้ว ให้กลับมาที่ Torque หน้าแรกและกด Android menu อีกครั้งเพื่อเลือก Setting จะปรากฏ Torque Setting ดังรูป
ให้เลือกที่ OBD2 Adapter Settingsจะปรากฏดังรูป

- ที่ Connection Type ให้เลือก Bluetooth
- ที่ Choose Bluetooth Device ให้เลือก ELM ที่เราได้ pair ได้ตั้งแต่ข้างตั้น

หากทำการยกเลิก Only if BT was already off จะส่งผลให้เมื่อเราทำการปิด Torque จะทำการปิด BT อัตโนมัติ
ให้กลับมาที่ Torque Setting อีกครั้ง
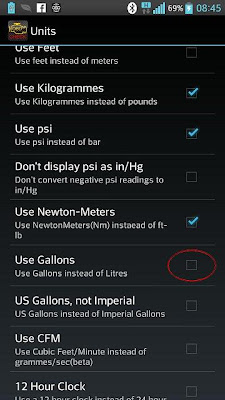
เลือกที่ Units จะปรากฏดังรูปและให้ยกเลิก Use Gallons เพื่อเปลี่ยนหน่วยเป็นลิตร
การใช้งาน Torque เบื้องต้น

ในการใช้งาน Torque เบื้องต้นนั้นจะมีส่วนหลักอยู่ 2 ส่วนดังนี้
 - Realtime Informations คือส่วนแสดงค่าต่างที่ ECU ส่งออกมา
 - Fault Codes คือส่วนที่แสดงค่า Error ต่างที่ถูกเก็บไว้ใน ECU

การเพิ่ม Gate Display


ให้ทำการเลือกที่ Realtime Informations จะพบหน้าแสดงผลดังรูป คือหน้า Gate display ที่ Torque ติดตั้งมาให้  หากไม่ประสงค์จะใช้งานเราสามารถลบออกโดยการแตะไปที่ Gate แต่ละตัวแล้วเลือก Menu Delete ได้

เราสามารถเพิ่ม Gate displayได้ทั้งหมด 7 หน้า
โดยวิธีการเพิ่ม Gate display มีดังนี้
แตะไปที่ว่างสักครู่ จะปรากฏ Menu ดังรูป ให้เลือกที่ Add Display
จะปรากฏรูปแบบของ Display ที่เราสามารถเลือกได้ขึ้นมาดังรูป
หลังจากที่เลือกรูปแบบของ Display ไปแล้ว Torque จะแสดง Sensor ที่มีให้เราเลือก  โดยเราสามารถเลือกได้เฉพาะ Sensor ที่มีสีเขียวเท่านั้น

 - สีเขียวแก่ คือ ยังไม่มีค่าใดส่งออกมา
 - สีเขียวอ่อน คือ มีค่าส่งออกมาแล้ว
 - สีดำ คือ ECU ของรถไม่ support ส่วนนี้

หลังจากเลือก Sensor เสร็จแล้ว Torque จะให้เลือกขนาดของ Gate display ก็เป็นอันสำเร็จ

ปล. ในหน้า Menu ที่ไว้เพิ่ม Gate display จะมี Munu Toggle HUD Mode ไว้สำหรับสลับซ้ายเป็นขวาเพื่อให้สะท้อนภาพจาก Android device ไปที่กระจกหน้ารถได้นะครับ  ใช้งานตอนกลางคืนมันยอดมากครับผม

การค้นหา Error ที่เก็บไว้ใน ECU

ให้เลือกที่ Check Fault Codes
จะปรากฏ Display ดังรูปและให้เราแตะที่หน้าจอเพื่อเริ่ม Scan หา Error code ที่เก็บไว้ใน ECU

หากมี Error codes เก็บไว้ใน ECU ก็จะปรากฏ list ของ Error ขึ้นมา

เราสามารถเอา Codes ที่ปรากฏไปตรวจสอบอีกครั้งว่า Error ต่างๆที่เกิดขึ้นมานั้นเกิดจากอะไร

หากต้องการที่จะลบ Error codes ออก ให้กดที่ Android menu จะมี menu ให้เราสามารถเลือกได้ว่าจะลบ Error codes ออก หรือเก็บเป็น Log ไว้

Sunday, January 20, 2013

โอนถ่าย Files ผ่าน Wifi ไม่ง้อสายด้วย WiFi File Explorer PRO (V. 1.8.2)


โอนถ่าย Files ผ่าน Wifi ไม่ง้อสายด้วย WiFi File Explorer PRO

มีรูป มีเพลงหรือมี Files อื่นอยู่ในเครื่อง อยาก Copy ลง Computer แต่ก็ดันไม่มีสายที่ใช้เชื่อมต่อ ว้าเซ็งจริงๆ
อะอะ แต่เดี๋ยวก่อนด้วย WiFi File Explorer PRO สามารถช่วยท่านได้ เพียงท่านสามารถเชื่อมต่อ Wifi ได้ ปัญหาท่านจะหมดไป

ดาวโหลดที่นี้ (Click Here to download) ^__^!
ติดตั้งให้เรียบร้อยแล้วเปิด Wifi ที่เพื่อเชื่อมเข้า Network ที่ Computer เครื่องที่เป็นเป้าหมายเชื่อมอยู่


เปิดโปรแกรมจะได้ดังภาพด้านข้างนี้ สังเกตที่ด้านล่างจะมี URL บอกว่ามือถือเรารอเชื่อมต่ออยู่ที่ไหน เช่น http://xxx.xxx.xxx.xxx:xxxx/


ให้เปิด Browser ที่ Computer แล้วนำ URL ที่ได้มาจากด้านบนวางลงไปจะได้ดังภาพด้านข้าง (ในกรณีที่มีการตั้งรหัสผ่านไว้)


 เมื่อ Login แล้วจะแสดงหน้าดังรูปด้านข้าง (หากไม่มีการตั้งรหัสผ่านจะแสดงหน้านี้เป็นหน้าแรก  โดยไม่มีหน้าที่ให้ใส่รหัสผ่าน)


เท่านี้เราก็สามารถโอนย้ายถ่าย Files ต่างระหว่างมือถือและ Computer ได้โดยไม่ต้องง้อสายเชื่อมต่ออีกต่อไป (สำหรับ Version 1.5.0 สามารถโอนย้าย fileได้ที่ละหลายๆ Files ด้วยนะครับ รูปที่ใช้อาจไม่ตรงกับ Version นักนะครับแต่ก็ดูเป็นแนวทางได้)

Saturday, January 19, 2013

Next Launcher - designed by GO Dev Team (V1.15)


Next Launcher
designed by GO Dev Team, is officially released now!At the end of 2012, we have a surprise for you!
Next Launcher, designed by GO Dev Team, is officially released now!

Next Launcher is a new launcher application which is full of glorious 3D elements and dynamic effects. Fancy 3D visual elements, gorgeous transition effects and humanized gestures bring you a unique and splendid operation experience and visual enjoyment.

Features:
  1. Various operation for icons: icons support rotation, reset, select, align and so on. Operation is easy and fantastic.
  2. Unlimited screen layout: placing icons or widgets randomly which forms your own home screen.
  3. Stereoscopic screen preview: lots of screen display effects, dazzling animation of screen switching about adding or deleting screen.
  4. Quick screen management: adding different kinds of elements in screen edit including application icons, folders and widgets. It’ll support changing wallpapers and themes soon.
  5. Rotatable dock: inverting upward or downward the Dock can quickly switch among home screen, screen edit and screen preview.
  6. Powerful app drawer: icons can be arranged by names or by time, and folders can be created by overlaying icons. Batch mode and operation of adding apps to screen are also available.
  7. Beautiful scrolling effects: a variety of app drawer scrolling effects that provide a distinctive screen switching experience.
  8. Fancy 3D widgets: 3D widgets that are based on Next Launcher are coming soon!
More information


^__^! v1.0.1
^__^! v1.12
^__^! v1.15

Friday, January 18, 2013

Bridge Constructor - Construct a bridge with different materials

Bridge Constructor

Construct a bridge with different materials, put it to the test using cars and trucks, and unlock the next brain-teasing level!

Explore the beautiful island nation of Camatuga and build bridges over deep valleys, canals, or rivers. Stress tests reveal whether the bridges you construct can withstand the daily stress of continual use from cars and trucks.

You can choose between a range of materials for each individual bridge, such as wood, steel, cables, or concrete pillars. Use the appropriate materials and stay within budget to construct the perfect bridge. Thanks to the choice of materials, you can build each bridge in any number of ways – your budget is the only limit. Set your imagination and creativity free in this fun physics puzzle and simulation game!

FEATURES:
• 40 brain tickling bridge construction levels
• 5 Settings: City, Canyon, Beach, Mountains, Hills
• 25+ challenging and fun achievements to unlock on Openfeint
• 4 different building materials: Wood, Steel, Cables, Concrete pillars
• Color coded load indicator for stress analysis
• Two different load bearing levels: Car and Truck
• High scores and leaderboards
• Facebook Connection (upload screenshots and bridge score)
• No ads in full version


Want to test please click here ==> ^__^!

Gene Effect - Explore ancient alien mines on the planet Kratoss


Gene Effect

Gene Effect is a side scrolling action-adventure. Explore ancient alien mines on the planet Kratoss. Collect resources on your way through deep mines and fight against natural phenomena, biological threats and mechanical devices. You can solve optional puzzles that unlock hidden areas containing relicts, artifacts and other goodies.

Upgrade your ship with artifacts and experience an epic story that unfolds using multiple, interweaved storylines.

Enjoy Gene Effect over and over again with randomized level content, 3 difficulty levels and different play styles.

Features:
- three different difficulty modes that increase the challenge
- find hidden artifacts to upgrade your ship
- 6 different trophies including score, time and skill based rewards
- statistical overview with interesting facts like overall progress, total playtime, travel distance and many more
- solve optional puzzles and discover secret places
- interactive environments with dangerous traps and tons of destructible objects
- randomly generated level content for varying and dynamic gameplay
- outstanding visuals using dynamic lighting and real physics
- unlock 25 music tracks and listen to them with an integrated music player


Want to test please click here ==> ^__^!
Extract Data File to /sdcard/Android/obb/
Data File

Thursday, January 17, 2013

Sweets Shop Live Wallpaper - A lot of very pretty sweets LiveWallpaper


Sweets Shop LiveWallpaper


A lot of very pretty sweets♪
Live wallpaper which feels kind of fun in the dreamland such as picture
book♪

★It is interlocked with time in noon and night.(*PaidVersion only)
★A boy and girl is appear♪They munch sweets by touch!
★A Cat, a dog and a bird are also appear♪ Touch it♪
★A shop, a train, a street, a candle and the moon also react to your touch♪
★Action after the end of trial period(Characters are not displayed. It does not react to a touch.)
★It corresponds to a horizontal screen.
★Able to store it on the SD card.(*OS2.2 or more)(*When you set it as wall paper, please save (move) it in the main body. The setting may returns to a default when you reboot.)

Setting method:home screen>menu>Wallpaper>Live Wallpaper


Want to test please click here ==> ^__^!